This article describes what is needed to get your instance of Issuetrak working with Zapier.
Ensure that you are on the Correct Version of Issuetrak
If your Issuetrak instance is hosted in the cloud by Issuetrak, then you do not need to worry about your Issuetrak version. If you host your own instance, then you will need to make sure that you are on the most recent version of Issuetrak.
The minimum required version is 14.9, but it is highly recommended that you be on the most recent version of Issuetrak. As we develop more endpoints for API v2, we will be adding more Zapier actions and triggers. The version of API v2 your site has will be tied to the version of Issuetrak you are on and if we add a Zapier action in the future, you may not be able to make use of it if you are not on the most recent version. To find the most recent version of Issuetrak, please refer to this article in our Help Center.
To check what version of Issuetrak you are on, log into your Issuetrak site and click on the dropdown in the top right corner. It should have your display name as the text. You will see your current version at the bottom of the dropdown. Note that this is only valid for relatively recent versions of Issuetrak.
If you are on an older version of Issuetrak then you will not be able to make use of Issuetrak through the Zapier platform. If you do not see the dropdown in the top right of your Issuetrak site, then you are on a version below 14 and will need to upgrade in order to make use of Zapier.
Ensure that you have API v2 Installed and Enabled
In order for Zapier to function, you must ensure that API v2 is both installed and enabled. If your site is hosted in the cloud by Issuetrak, then you do not need to worry about installing API v2. If you host your own instance of Issuetrak and you need help installing API v2, please refer to this article in our Help Center.
Once you have API v2 installed, you need to ensure that it is enabled. In order to do this:
- Log into your Issuetrak site as a system administrator.
- Click on the gear in the top right > click API v2 beneath Integrations.
- Ensure that the Enable API v2 checkbox is checked. If it is not, then you will need to check the box and then click Update.
Create an API Token
In order to authenticate against Issuetrak using Zapier, you will need an API token. Specifically, you will need a token that represents an agent account with one of the permissions below:
- Sys Admin
- Can access and maintain Administration functions
To create an API token, perform the following.
- Log into your Issuetrak site as either a system administrator or a user with both “Can access and maintain Administration functions” and “Can authenticate with the API v2” permissions.
- Click on the gear in the top right > click API v2 beneath Integrations.
- Click Tokens on the right quick menu.
- Click on the Add New button.
- Complete the "Create New Token" form and then click Create Token.
- When creating your token, it is recommended that you give a name to the token that is reflective of how the token will be used. If you plan to use the same token for all of your Zaps, then you should give it a name like “Zapier”. If you intend to use different tokens for different Zaps, then the name should reflect those use cases.
- The “Expiration Date” field is optional but strongly encouraged. The expiration date provides a way to enforce “key rotation” policies. If you provide an expiration date, then the generated token will stop working after the date specified. If you do not provide an expiration date, then that token will work until it is manually revoked.
- If you are signed in as a system administrator, you will also see the “User” field. If you do see the User field, then you have two options:
- You can leave it blank, which means that actions performed by Zapier will be performed as the user you are currently signed in as.
- Alternatively, you can select another system administrator or a user with both of the aforementioned permissions, which will result in Zapier performing actions as the user you've selected.
- When creating your token, it is recommended that you give a name to the token that is reflective of how the token will be used. If you plan to use the same token for all of your Zaps, then you should give it a name like “Zapier”. If you intend to use different tokens for different Zaps, then the name should reflect those use cases.
- Copy the New Token value. This is the only time you will see the value for this token.
Filling Out the Authentication Screen on Zapier
The Authentication screen will contain three fields as shown below:
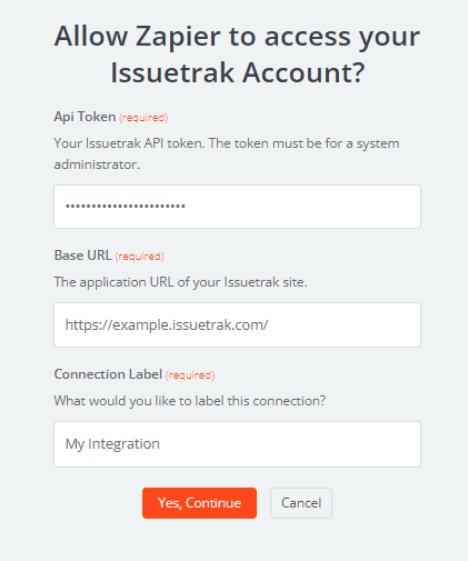
- The API Token field should be the value presented after creating the token in Issuetrak using the steps above.
- The Base URL should be the same value as the Application URL from your Issuetrak site. You can retrieve this by performing the following steps:
- Click on the gear icon in the top right > click on Defaults under System.
- Copy the value in the "Application URL" field.
- The Connection Label can be anything you want, but it is recommended that you enter the text that matches the “Token Name” of the token that you generated. This will allow you to identify the Zapier connection you need to update if you choose to revoke the token or if it expires.
Update Actions in Zapier
When updating things in Issuetrak via Zapier, there is an implicit merge process that happens behind the scenes.
For example, let’s say that we add a step to a zap to update a user. When defining this action, the only required field is the IID of the user to update, even though there are many required fields on users. This works because we do not overwrite fields that were not defined in the Zapier step. If we were to set up an update user action step in Zapier with only the IID and the email address, then every user targeted by that action would have their email address updated, but all other fields would remain intact.
Adding and Updating Group Permissions Through Zapier
Handling permissions through Zapier is made to be much more stable, but may result in confusing behavior. The main thing you should know is that we automatically handle conflicting permissions and pre-requisite permissions.
If you were to make an API call to Issuetrak in order to create a Group, and you tried to give it the permissions “Can be assigned Issues”, but you did not grant “Can view Assigned To information in Issues and email notifications”, then this would return a validation error. Through Zapier, we handle this conflict by automatically granting permission to view assignment information.
Another thing that is handled by our Zapier integrations is conflicting permissions. Let’s say we wanted to create a group, but we gave it both “Allowed Read Only access to Administration information” and “Can access and maintain Administration functions”. Through the API this would cause a 400 validation error, but in Zapier we do some extra error prevention by removing one of the conflicting permissions with a bias towards the higher of the two. For instance, if we created a group with the permission “Can access and maintain Asset Management Module functions” and “Allowed Read Only access to Asset Management information”, we would grant “Can access and maintain Asset Management Module functions” because that permission provides a greater level of access.
