Automation is a feature that facilitates automated changes to issues according to a set of criteria defined by an administrator.
In order to set up Automation, you must have the “Sys Admin” parameter or “Can access and maintain Administration functions” permission.
There are three issue automation features available by navigating to the Left Menu > choosing Automation:
Auto Assignments
Auto assignment rules will automatically assign issues immediately upon submission to certain users or groups.
Workflows
Workflows provide the ability to update issues in a variety of ways after certain defined criteria are met.
Substatus Rules
Substatus Rules (if Substatuses are activated) will automatically change the Substatus field or pause the System Clock for an issue based on defined criteria.
You can have the system automatically assign issues immediately upon submission to certain users or groups through Auto Assignments.
Please note that a group must have active members and have the permission Can be assigned issues in order to show up in Assign To lists.
Depending on the other features and fields configured within your site, this can include assignments based on any of the following field values:
- Organization
- Department
- Location
- Class
- Type
- Subtype (1 through 4)
- Priority
- Project
- Submitted Between (server time)
- Submitted On (days of the week)
For example, issues can be auto-assigned based simply on Issue Type = Service. They can also be auto-assigned based on more complex criteria, such as Issue Type = Service AND Organization = WVF Systems AND Submitted On = Monday-Friday. In these cases, all field value criteria defined must be true for the assignment to occur.
If there are multiple rules that use Issue Types and Subtypes, then the rule with the most specificity will be applied. With that in mind, in a case where one rule applies to one particular Issue Type, and another rule applies to that same Issue Type as well as a particular Issue Subtype, then the rule that applies to the Subtype will be applied to a given issue.
Among Auto Assignments based on a single field value, Precedence determines the order in which the system will look for a relevant value.
For example, if an issue meets the criteria for Auto Assignment A: Issue Type = Payroll, as well as Auto Assignment B: Location = Sacramento CA, but Precedence for Issue Type = “2” and Precedence for Location = “1,” the issue will be assigned using Auto Assignment B.
Auto Assignments occur only as an issue is submitted. Even if field values change during an issue’s life cycle, Auto Assignment remains in effect unless the Assigned To is changed manually within the issue or automatically due to a Workflow or Global Issue Link.
To see a demonstation of how to create an Auto Assignment Rule, click the Continue button to start the presentation below.
Click here to see a complete list of our training videos
Adding Auto Assignments
Steps:
- Navigate to the Left Menu > choose Automation > Auto Assignments.
- Select Add beneath Auto Assignments from the right context menu.
- Select the relevant criteria for this auto-assignment.
- Click on the magnifying glass next to the Auto-Assign To field.
- Click on the Display Name of the user to be auto-assigned in the Select User Record window that appears.
- Click Save.
A confirmation message will appear when this process is complete.
Editing Auto Assignments
Steps:
- Navigate to the Left Menu > choose Automation > Auto Assignments.
- If you simply wish to toggle the "Active" status of a rule, you may do so now. This will be effective immediately and without confirmation. The steps below are not necessary to apply this change.
- Click edit next to the Auto Assignment you are modifying.
- Make your changes in the Edit Auto Assignment screen that opens.
- Click Update.
A confirmation message will appear when this process is complete.
Managing Auto Assignments Precedence
Steps:
- Navigate to the Left Menu > choose Automation > Auto Assignments > select Precedence from the right context menu.
- Define — in descending order — which field determines the proper Auto Assignment when issues simultaneously qualify for multiple Auto Assignments based on a single field value.
- Click Update.
A confirmation message will appear when this process is complete.
Deleting Auto Assignments
Steps:
- Navigate to the Left Menu > choose Automation > Auto Assignments.
- Click del next to the Auto Assignment you are deleting.
- Click OK when prompted to confirm.
A confirmation message will appear when this process is complete.
Your system can automatically escalate and take action in issues that remain open or idle for too long through Workflows. Workflows help ensure that assignees and submitters never neglect or abandon their issues, especially when they are used in conjunction with substatus rules and subscribers list configuration options.
Workflows can be set to apply either During or Outside of your site's hours of operation.
If you select "Outside Hours of Operation", then the workflow will only apply to:
- Issues that were submitted outside of the hours operation
- Issues that have never had a workflow applied to them
Workflows Best Practices
There is no limit to the number of workflows you can create. Each workflow may have several parts to it, including:
Time Interval — Choose whether the rule should apply to issues during or outside of hours of operation:
- If the rule applies during hours of operation, then you can choose the days, hours, and / or minutes from Time Entered or Last Activity events.
- Time Entered: The amount of time after either the time the issue was submitted, or the time of the issue's last escalation, whichever is most recent.
- Last Activity: The amount of time after the time the issue was submitted, the time of the issue's last escalation, or the time of the issue's last activity, whichever is most recent.
Conditions — other criteria that must be met, such as:
- Priority
- Location
- Substatus
- Project
- System Clock Status (Paused, Not Paused)
- Number of previous escalations
- Issue Type
- Assignment Status (Assigned, Not Assigned)
- Subtype (1 through 4)
- Assigned To
- Organization
- Target Date passing
- Department
- Required By Date passing
Actions — other system-generated events that occur along with escalation, such as:
- Updating the Assigned To
- Adding a (Public or Private) Note
- Updating the Priority
- Distributing (additional) Email Notifications
- Updating the Substatus
- Closing the issue
Process Order — the workflow’s place among other workflows in the processing queue
In addition to Time Interval, the rate at which escalations occur is also based on the "Issue Escalations" scheduled task on your Web server. Escalation can never occur at an interval greater than the current scheduled task rate. For example, the "Issue Escalations" scheduled task is generally set during installation to a default rate of every 15 minutes. If you define a workflow with a time interval of 5 minutes, you will need to increase the task rate to at least every 5 minutes or this workflow will still only be processed at 15-minute intervals.
Every time the "Issue Escalations" scheduled task runs, it will process all workflows, starting with your "Process Order = 1" workflow. This means an issue may escalate many times during its life cycle, based on the same workflow and / or different workflows that apply as its values change. However, the issue will only escalate against one workflow each time the task runs, so the first workflow that applies based on process order.
To minimize redundancy, try to use conditions whenever possible and actions that change at least one conditional value so most workflows never apply more than once.
Example:
Workflow A states:
… IF (Time Interval) = “2 Hours” after “Time Submitted”
… THEN ESCALATE
… AND (Actions) Send Notification To = “Stan Sitwell”
ANY issues that stay open for longer than 2 hours after submit will be escalated by this workflow. As long as these issues remain open—the same workflow will continue to apply every time the task runs. Each time, Stan (and any Subscriber List Members with notify On Escalate) will also be sent another notification.
Workflow B states:
… IF (Time Interval) = “5 Days” after “Last Activity”
… AND (Conditions) Issue Type = “Service” AND Subtype 1 = “Request” AND Substatus = “Pending User Response-1st Attempt”
… THEN ESCALATE
… AND (Actions) Add Note = “We have not heard back from you on this service request. Please let us know what day and time
we can perform your service.” AND Set Substatus To = “Pending User Response-2nd Attempt”
ONLY issues that stay open for longer than 5 days without any activity that also have this particular Issue Type, Subtype, and Substatus will be escalated by this workflow. As long as these issues remain open and their Substatus does not change back to Pending User Response-1st Attempt — the same workflow will not apply again. The Submitter will not receive this particular “friendly reminder” again.
In addition, consider your process orders carefully. If workflows have similar criteria and may ever be applicable at the same time — BUT one of those workflows changes a conditional value so the other workflows no longer apply — that workflow should be processed before any other workflows with similar criteria.
For example, Issue #12345 is currently a High Priority issue that has had no activity for almost 4 hours…
Workflow X states:
… IF “2 hours” after “Last Activity”
… AND Priority = “High”
… THEN ESCALATE
… AND Send Notification To = “Steve Anderson”
… Process Order = 17
Each time the "Issue Escalations" scheduled task has run since the 2 hours after last activity mark, this workflow has continually escalated Issue #12345 and notified Steve.
Workflow Y states:
… IF “4 hours” after “Last Activity”
… AND Priority = “High”
… THEN ESCALATE
… AND Update Priority To = “Critical” AND Update Assigned To = “Michael Bluth” AND Send Notification To = “Steve Anderson”
… Process Order = 16
When the "Issue Escalations" scheduled task runs at the 4 hours after last activity mark, this workflow will make any further escalations of Issue #12345 by Workflow X obsolete. So Workflow Y has been placed before Workflow X in the processing queue using their process orders.
All users can view workflow-related data in issues and reports.
To see a demonstation of how to create a workflow, click the Continue button to start the presentation below.
Click here to see a complete list of our training videos.
De-Escalation Best Practices
You also have the ability to de-escalate issues that have been marked as Escalated in your system. Issue de-escalation is disabled by default and must be activated from the Features page before it can be used. You can find out more about this feature in the "About Issue De-Escalations" article.
Adding Workflows
Steps:
- Navigate to the Left Menu > choose Automation > Workflows.
- Select Add from the right context menu.
- Select either "During Hours of Operation" or "Outside Hours of Operation".
If you select "Outside Hours of Operation", then this workflow will only apply to:
- Issues that were submitted outside of the hours operation AND
- Have never had a workflow applied to them
- If you selected "During Hours of Operation" above, then enter the number of Days, Hours, and / or Minutes and from which issue event (Time Submitted or Last Activity) this new workflow is to take effect.
Last Activity is triggered only by the following events: Issue Assigned, Next Actioned or Edited; Note Added or Edited; and Task Added, Edited, Deleted or Completed.
- (Optional) Define any additional conditions that apply.
- (Optional) If you want any other actions to occur based on this Workflow, define those actions.
- Enter Workflow Name and Process Order for your new workflow.
- Click Save.
A confirmation message will appear when this process is complete.
You can add members to this workflow’s Subscribers by editing the workflow after you've saved it
Editing Workflows
Steps:
- Navigate to the Left Menu > choose Automation > Workflows.
- If you wish to toggle the "Active" status of a workflow, you may do so here. This will be effective immediately and without confirmation. The steps below are not necessary to apply this change.
- Click the edit link next to the Workflow you are modifying.
- (Optional) Before making any other changes on the Edit Workflow screen, use the View / Maintain Subscribers link to add or change member settings on this Workflow’s Issue Subscribers.
- Make your changes on the Edit Workflow screen.
- Click Save.
A confirmation message will appear when this process is complete.
Deleting Workflows
Best Practice: Always deactivate rather than delete existing items within your system. In this case, you can simply uncheck the box next to Active at the bottom of a Workflow.
Steps:
- Navigate to the Left Menu > choose Automation > Workflows.
- Click del next to the Workflow you are deleting.
- Click OK when prompted to confirm.
A confirmation message will appear when this process is complete.
Substatus Rules are a mechanism that allows you to configure Issuetrak to automatically change the Substatus field or pause the System Clock for an issue.
Substatus Rules
If the Issue Substatus field is activated in your site, you can add Substatus Rules to automatically update issues to a different Substatus when certain events occur.
For example, if an issue’s Substatus is User Response Needed, its Substatus could be updated to Under Review as soon as the Submitter adds a note.
Among these types of Substatus Rules, there is also a Process Order that defines which Rule is to be applied when issues simultaneously qualify for multiple Substatus Rules.
Pause Clock
Substatus Rules may also be used to pause the System clock when issues have certain Substatuses. Once the clock has been paused on an issue—its Adjusted Time Open (i.e. Total Time Open minus how long clock is/was paused) will be used for Workflows, SLAs, and standard reports instead of its Total Time Open (i.e. exactly how long issue is / was open).
For example, if the Substatus User Response Needed pauses the system clock, an issue with this Substatus would not continue to accrue Workflow or SLA processes until the Submitter adds a note or a user changes its Substatus.
To see a demonstation of how to create a Substatus Rule and a Pause Clock Rule, click the Continue button to start the presentation below.
Click here to see a complete list of our training videos
Adding Substatus Rules
Steps:
- Navigate to the Left Menu > choose Automation > Substatus Rules.
- Select the Issue Event that triggers this new Rule.
Notes added when using the “Email Issue” function are not recognized as “Add Note”, “Note Added by Submitter”, or “Note Added by Submitting Organization” issue events.
- Select the Substatus criteria for this event.
- Select the Substatus to be applied.
- Define the Process Order for this new Rule
- Click Save.
A confirmation message will appear when this process is complete.
Adding Substatus Pause Clock Rules
Steps:
- Navigate to the Left Menu > choose Automation > Substatus Rules.
- Scroll down to the System Clock Pausing section.
- Select the Substatus you want to automatically pause the system clock (i.e. all Total Time Open, Workflow, and SLA calculations) on issues.
- Click Save.
A confirmation message will appear when this process is complete.
Editing Substatus Rules
Steps:
- Navigate to the Left Menu > choose Automation > Substatus Rules.
- Click edit next to the Rule you are modifying.
- Make your changes.
- Click Save.
A confirmation message will appear when this process is complete.
Deleting Substatus Rules
Steps:
- Navigate to the Left Menu > choose Automation > Substatus Rules.
- Click del next to the Rule you are deleting.
- Click OK when prompted to confirm.
A confirmation message will appear when this process is complete.
Whether you're just learning about Round Robin for the first time, or you've just enabled it for a group in your instance of Issuetrak, you'll want to know what you can use this feature for. This article will discuss a few use scenarios for Round Robin and how it can make your work easier.
Quickly Re-Assign Any Quantity of Issues
Issuetrak has long provided the ability to make specific changes to a large quantity of issues meeting specific criteria. We call this feature Mass Update Issues. With the introduction of Round Robin, we can envision scenarios wherein these two features can be combined to reduce your stress and workload.
Fix Any Quantity of Incorrect Issue Assignments
You return from vacation to find out that a new team member has been assigning all of the issues they entered to the wrong team for a week. This looks like it could be a lot of work - there are over 100 issues that need to be properly re-assigned!
Steps:
- Either create or have a Round Robin group in mind that you want to re-assign the issues to.
- Create a report in Report Writer to look at all of the issues the new team member entered for the past week.
- Select the Issues data set.
- Select the fields:
- Issue Number
- Entered On
- Entered By
- Assigned To
- Set the filters:
- Status = Open
- Entered By = [New Team Member]
- Entered On = Date Range
- Save and run the report.
- Validate that the results only contain the issues that you want to re-assign.
- Click the gear icon in the upper right > Click on Mass Update Issues beneath Tools.
- Set Select Report to the report that you created in step 2.
- Set Choose Field to Assigned To.
- Set New Value to your team's Round Robin group.
- Click Update.
This will distribute the issue assignments amongst your team in far less time than if you did so manually.
Re-Distributing a Team Member's Issues
When one of your teammates needs to go on maternity leave, vacation, or any other length of time without working, you can easily re-distribute their issues amongst your colleagues.
Steps:
- Either create or have a Round Robin group in mind that you want to re-assign the issues to.
- Create a report in Report Writer to capture all open issues currently assigned to the team member that is going on leave.
- Select the Issues data set.
- Select the fields:
- Issue Number
- Entered On
- Entered By
- Assigned To
- Set the filters:
- Status = Open
- Assigned To = [Team Member Taking Leave]
- Save and run the report.
- Validate that the results only contain the issues that you want to re-assign.
- Click the gear icon in the upper right > Click on Mass Update Issues beneath Tools.
- Set Select Report to the report that you created in step 2.
- Set Choose Field to Assigned To.
- Set New Value to your team's Round Robin group.
- Click Update.
The employee's issues are now distributed amongst the team.
Create Different Auto Assignment Rules for Every Shift
If you have day and night teams that traditionally pull from the Unassigned queue, you can combine Round Robin with Auto Assignment rules that will continuously distribute incoming issues amongst the team members that share a common schedule. In this scenario, we will assume you have a day shift and a night shift that works Monday through Friday. Each shift belongs to a Round Robin group called Day Shift or Night Shift, respectively:
- Day Shift: 6:00AM - 2:00PM
- Night Shift: 2:00PM - 10:00PM
Day Shift Steps
- Navigate to the Left Menu > choose Automation > Auto Assignments.
- From the right context menu, click Add beneath Auto Assignments.
- Fill in the initial matching criteria for issues that you want to be auto-assigned.
- Set the Submitted Between schedule for the Day Shift Round Robin group:
- 6:00AM - 2:00PM
- Set the Submitted On days to Monday through Friday.
- Set the Auto-Assign To field to: Day Shift.
- Click Save.
Night Shift Steps
- Navigate to the Left Menu > choose Automation > Auto Assignments.
- From the right context menu, click Add beneath Auto Assignments.
- Fill in the initial matching criteria for issues that you want to be auto-assigned.
- Set the Submitted Between schedule for the Night Shift Round Robin group:
- 2:00PM - 10:00PM
- Set the Submitted On days to Monday through Friday.
- Set the Auto-Assign To field to Night Shift.
- Click Save.
In following the steps above, you've just configured Issuetrak to distribute issues based on the shift of the teams you manage. There is no need to activate or inactivate these rules when business hours end. The Round Robin Auto Assignments will automatically work according to the schedule you set!
Automatically Cycle Through On-Call Staff
If you have team members that remain on-call for after-hours support, then you know how important it is for them to respond to emergencies in a timely manner. These steps will show you how to use Automation in conjunction with Round Robin to help ensure that on-call staff responds to emergencies. In this scenario we will assume that your site has:
- A Round Robin group called On-Call.
- After-hours support between 10PM and 6AM, which the On-Call group covers.
- An issue type called Emergency.
- A default issue substatus called New, which is prohibited in your team's workflow for issues that are being addressed.
- Email notifications enabled for the issue assignee.
Part 1: Auto Assignment Rule Steps
- Navigate to the Left Menu > choose Automation > Auto Assignments.
- From the right context menu, click Add beneath Auto Assignments.
- Set the matching criteria to Issue Type = Emergency.
- Set the Submitted Between schedule for the after-hours support:
- 10:00PM - 6:00AM
- Set the Submitted On days to Monday through Friday.
- Set the Auto-Assign To field to: On-Call.
- Click Save.
Part 2: Workflows Steps
- Navigate to the Left Menu > choose Automation > Auto Assignments.
- From the right context menu, click Add beneath Auto Assignments.
- Set the Interval fields for 10 minutes after Last Activity.
- Set the matching conditions to:
- Substatus = New
- Issue Type = Emergency
- Set the Set Assigned To field to On-Call.
- Set Add Note to: "On-call technician hasn't responded. Assigning to the next technician in rotation."
- Mark the note as Private.
- Name the rule After-Hours On-Call.
- Click Save.
After you've followed the steps above, your site will automatically re-assign a new emergency issue every 10 minutes, adding a note informing the reader why it has done so. The auto-assignment rule stops processing when normal business operations begin at 6 AM, while the workflow will continue running round-the-clock until the issue substatus or issue type is changed.
Issuetrak has several types of automation that allow you to automatically update issues in various ways to keep their progress moving forward. In this article, we will discuss examples of how you can utilize combinations of automation that will work together to save you time and effort.
Before we get started, it's a good idea to familiarize yourself with the mechanisms at play here:
Understanding the Clock
Issuetrak provides two time measurements the moment an issue is submitted: "Total Time Open" and "Response Time". These are determined by your Hours of Operation and automation.
| Total Time Open | Adjusted Time Open |
|---|---|
| This is the entire amount of time that an issue has been open including the times that the clock was paused. | This is the amount of time an issue has been open excluding the amount of time the issue was paused. |
The Adjusted Time Open also provides users with the timeframe that the owner of the issue is responsible for.
Why is this Important?
-
Time waiting on a response counts against you. Many businesses and organizations like to measure how long it takes for something to happen. This is often used as a performance metric.
-
Avoiding issue stagnation keeps issues moving to closure. Automated processes keep the issue moving forward and make it clear where accountability lies. Waiting on a response from a user can allow issues to stagnate. Using Workflows to progress the issue to closure allows for open communication. Substatuses are set automatically to show where the responsibility of the issue lies. This allows the issue owner to attend to other issues without having to babysit issues that need another user's response.
-
Implementing automation allows you to determine when an issue was opened, versus how long the 'ball' has been with you and your team. The Adjusted Time Open clock for any given issue is paused by any rule that is applied to the issue that has the Pause Clock option toggled.
Analyze the Process
There are a few things you will want to consider before creating or adjusting automation:
- Who should be responsible for the pending action? The responsible user should become aware that they are now in charge of moving the issue forward.
- How long do you want to wait for a response? The workflows will fire at a time you configure. Determine how much time you are willing to let the issue sit before an automated action is made to keep the issue moving forward.
- Name your substatus with a good naming convention. The substatuses will inform the users of where in the process the issue is and therefore the substatuses need to be clear and easily understandable at a glance.
- Make a flowchart of your process (Process Document/flow).
Create Substatuses
We developed a process in the Issuetrak Support site that we've been using to automate our correspondence with customers to keep issues moving forward. We use a combination of Substatus Rules and Workflows to:
- Pause the clock so that time waiting on a user response is not counted against us.
- Quickly ascertain where the responsibility for that issue currently lies.
- Ensure that an issue doesn't stay unattended for a certain amount of time.
Our support team uses automation as a way to respond to our clients consistently, progress their issues along, and make sure that they have been fully satisfied with the resolution. This also ensures that time waiting on the submitter to respond will not count against our Service Level Agreements or affect the reporting of team metrics.
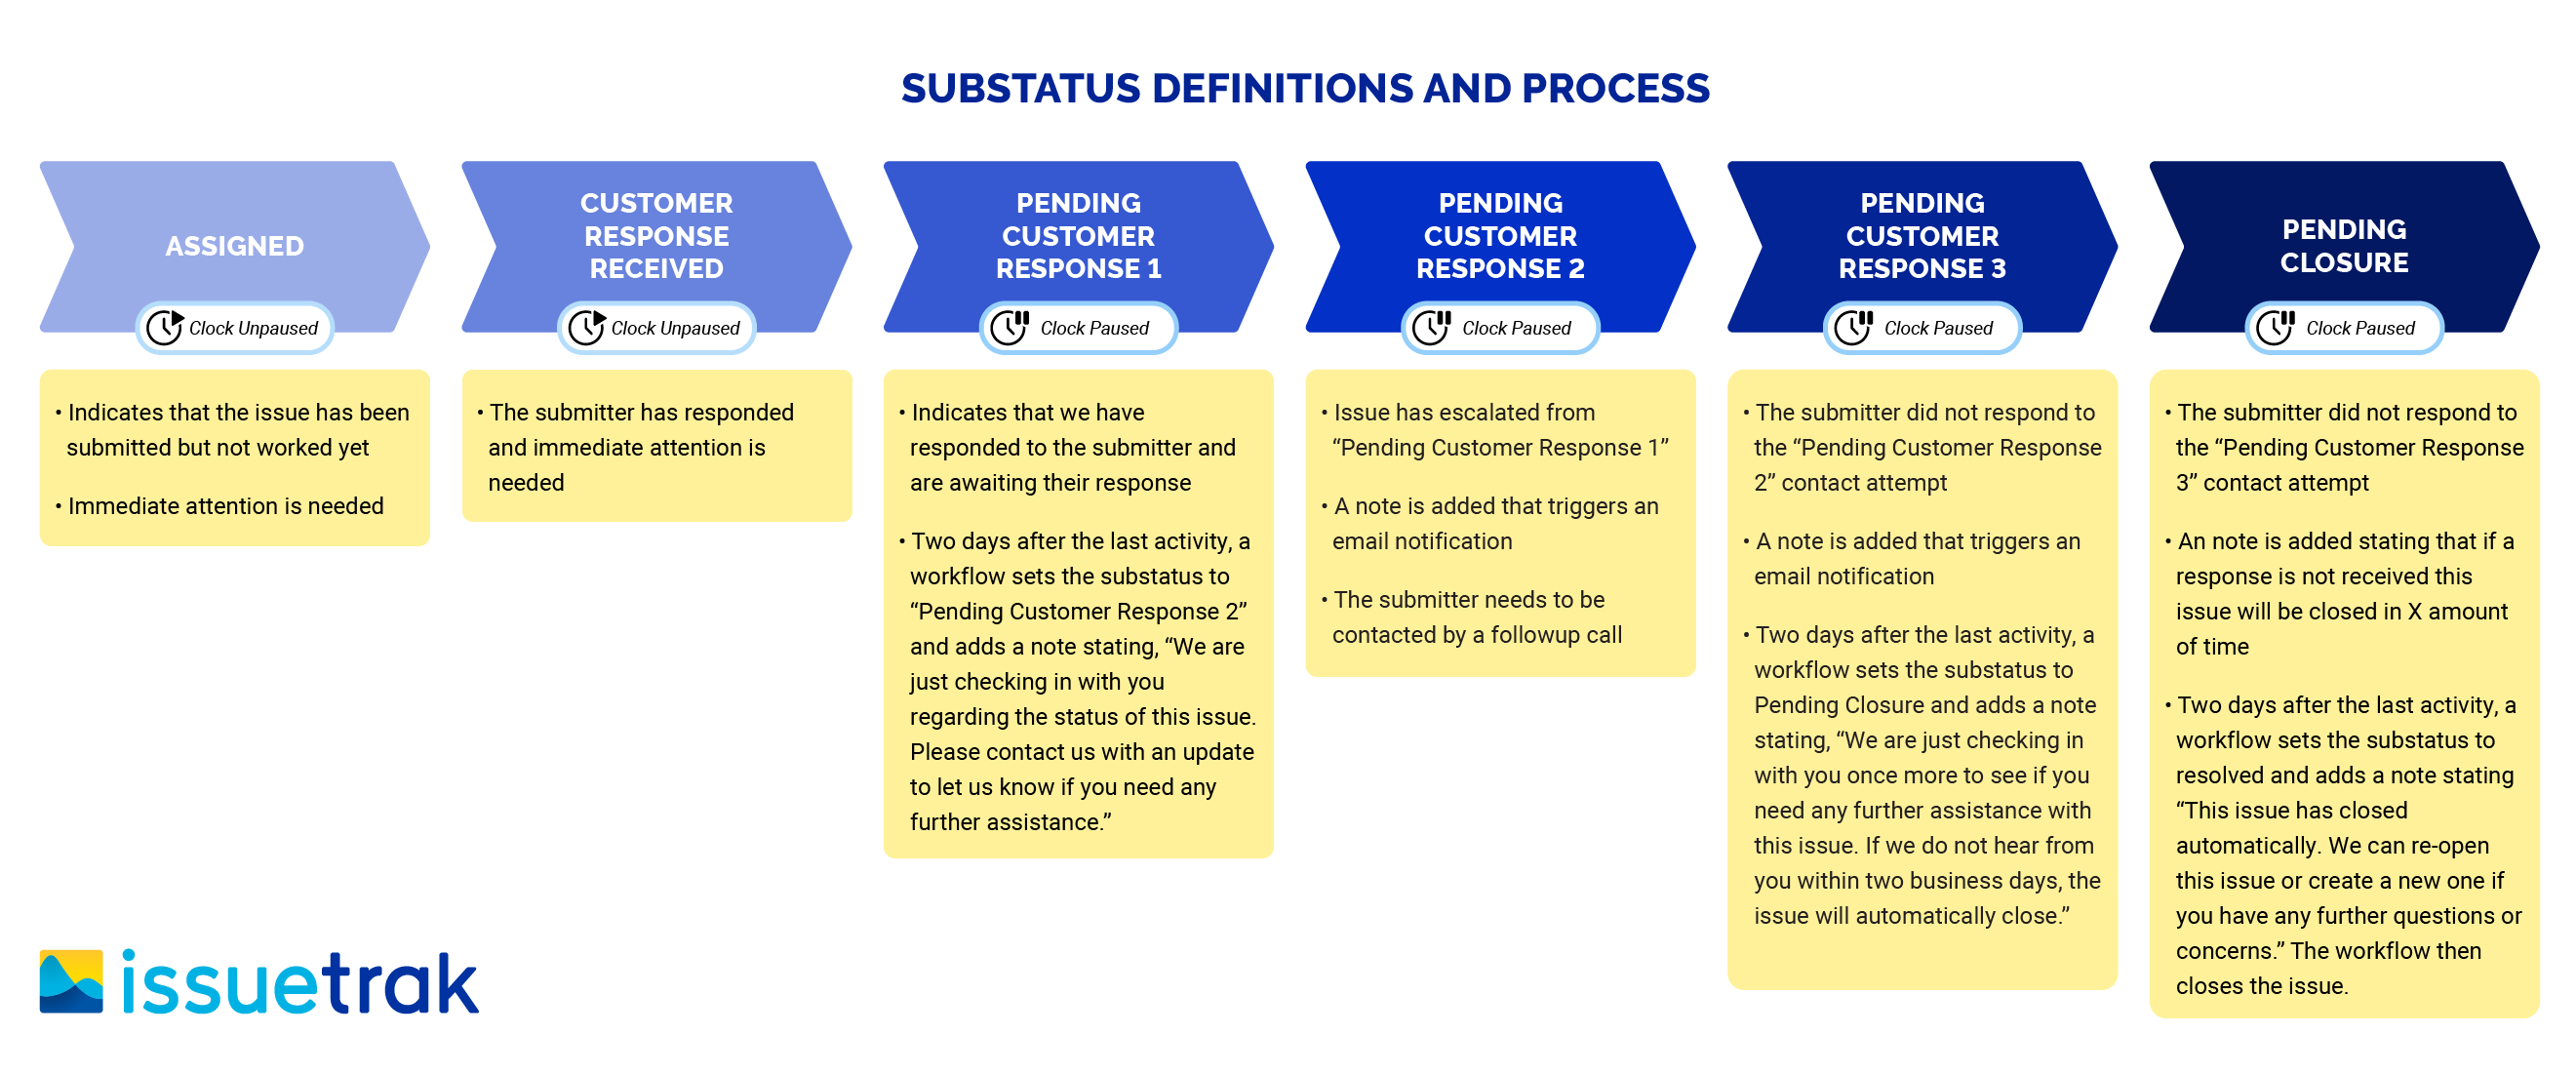
We started with creating substatuses that easily indicate the responsibility and progress of that issue. A good naming convention is important here as this field will indicate many things about an issue. Six substatuses were created to facilitate this process. Your organization may choose to use fewer or more substatuses based on your needs. Issuetrak can be customized to match your workflow and processes very easily.
Substatuses will drive this entire process since all of the automation is triggered by which substatus is on the issue. They need to be clear, descriptive, and easily understandable at a glance.
| Substatus Name | Clock Status | Description |
|---|---|---|
| Assigned | Unpaused |
|
| Customer response received | Unpaused |
|
| Pending Customer Response 1 | Paused |
|
| Pending Customer Response 2 | Paused |
|
| Pending Customer Response 3 | Paused |
|
| Pending Closure | Paused |
|
As you can see above, we have configured four of the substatuses to pause the clock since we will be waiting on a response from the submitter when issues are in these substatuses. Pending Customer Response 1 Pending Customer Response 2 Pending Customer Response 3 Pending Closure
Now that we have our foundation of substatuses, it is time to automate them with substatus rules and workflows. These rules will look at the substatus in order to determine what actions to take. Our biggest goal is to be able to respond back to submitters as soon as we can. In order to accomplish this, we will create a substatus rule to set the substatus to Customer Response Received every time the submitter added a note to an issue. This will allow us to easily see that immediate attention is needed. Also, the Customer Response Received substatus will now unpause the clock, if it was paused, and put ownership clearly back to the assignee.
Define Substatus Rules
Let's look at the substatus rules we made to reduce our workload:
Issue Event = Note Added by anyone in Submitter's Organization - We use this Issue Event because we have Organizations that contain many users. We wanted to allow other users from that Organization to be able to respond to issues and have the Substatus rule fire. There are other note-added events available that may work better for your needs.
When Substatus = Any Value - This allows the substatus rule to fire any time the submitter responds to an issue which is invaluable when your goal is to respond to issues as quickly as possible.
Set substatus to = Customer Response Received - This substatus is what we use at Issuetrak Support to focus our attention on every day. This substatus means that the submitter has responded and the issue needs our immediate attention.
Now it is time to automate the process further with Workflows. The workflows are time-triggered events that fire off after a predetermined amount of time has passed. This keeps the issues moving forward by performing an action on the issues. Workflows are used to inform the responsible party that their attention is needed and that the issue has sat too long without action taken.
Workflows
Here are the Workflows we configured:
| Rule Name | Interval | Condition | Actions |
|---|---|---|---|
| Pending Customer Response 1 | 2 Days after last activity | Substatus = Pending Customer Response 1 |
|
| Pending Customer Response 3 | 2 Days after last activity | Substatus = Pending Customer Response 3 |
|
| Pending Closure | 2 Days after last activity | Substatus = Pending Closure |
|
Now that the automation is configured you can use the Issue Hub or Dashboard to easily view issue substatuses and monitor the progress of issues. This is valuable information to managers and agents since they can immediately see which issues need attention and which issues are waiting for a response from the submitter. Sorting by substatuses is a technique used to create a worklist and prioritize your issues so that a timely response can occur.
Closing Thoughts
If you have any questions or would like the assistance of our product experts, please do not hesitate to contact us with any questions.
Introduction
Issuetrak, a powerful issue tracking and management system, provides automation features that streamline processes, save time, and improve workflow efficiency. There are two distinct types of automations: Time-Based workflows and Event-Based Substatus Rules. In this article, we will explore the functionalities of both automations types and discuss scenarios where each can be effectively employed to enhance your Issuetrak experience.
Substatuses: A majority of the automation available in Issuetrak is driven by substatuses. Substatuses are optional fields available on issues that provide more detailed information about their current state. You get to define what they say, but we recommend using them to describe an issue's current stage in the resolution process and who is responsible for taking action on it. In terms of automation, you can create rules that change an issue's substatus based on certain events, which then trigger workflows that provide follow-up reminders and more. If an issue sits too long with no activity, Issuetrak workflows can automate reminders to the responsible user or group. Substatus rules can automate the substatus changes so that workflows can be triggered.
Examples of common substatuses:
- New
- Assigned
- On Hold
- In Research
- Pending Submitter Response
- Submitter Response Received
For more information on Substatuses please reference this Help Center Article.
Time-Based Automation: Workflows
Time-Based Automations allow users to automate actions based on the time interval and conditions of an issue. Workflows can perform actions if the interval and conditions are met.
There are 3 parts to a workflow:
- Interval - How much time has passed from time submitted or a period of inactivity.
- Conditions - The conditions of the issue that you want to monitor.
- Actions - The actions performed when the Interval and Conditions are met.
Scenarios for Time-Based Automations
No response by submitters - If a submitter does not respond, Issuetrak can deliver great customer service automatically by adding notes to issues. This will send an email to the submitter to remind them that we are still waiting on their response. This can free up time for your agents to work issues that need attention instead of babysitting issues or hunting down submitters that are not responsive.
Service Level - If an issue is not handled in a timely manner, workflows can trigger reminders to agents or other users that they need to respond immediately to deliver the submitter a response. When an issue has been inactive for a certain amount of time, Issuetrak can remind the user or group responsible that their action is needed.
Steps to implement
Example criteria for a time based automation - Workflow: Send the submitter an email to let them know that we have been waiting on a response from them for 3 days.
- Interval
- 3 days from Last Activity
- Conditions
- Substatus = Pending Submitter Response
- Actions
- Add note - “We have not heard back from you in 3 days. Do you need further assistance?”
Log into ittraining.issuetrak.com to view this configuration and more examples.
For more information and configuration of Workflows please reference this Help Center Article.
Event-Based Automation: Substatus Rules
Event-Based Automations are activated in response to specific events on an issue such as note added by submitter, open, close, assign, etc.
Scenarios for Event-Based Triggers
Submitter Responses - Replies from submitters can change the substatus so you can tell when a submitter has responded. Issuetrak can “Flag” issues to let agents know that the submitter has responded to an issue by changing the substatus from Pending Submitter Response to Submitter Response Received.
Team Time Calculations - Substatus changes can pause and unpause the clock automatically. There are two time calculations in Issuetrak.
- Total Time Open - The time from submission to the time of closure.
- Adjusted Time Open - The time from submission to the time of closure minus the time when the issue was in a paused state from a substatus such as Pending Submitter Response.
Steps to Implement
Example Criteria for an Event Based Automation - Substatus Rule: Change the Substatus to Submitter Response Received anytime a submitter adds a note to the issue.
- Issue Event
- Note Added by Submitter
- When Substatus Equals
- -Any Value-
- Set Substatus To
- Submitter Response Received
Log into ittraining.issuetrak.com to view this configuration and more examples.
For more information and configuration of Substatus Rules please reference this Help Center Article.
Additionally, here is a Help Center article on how the Issuetrak Support team uses automations.
Conclusion
Issuetrak's Time-Based and Event-Based Automations are powerful tools that facilitate workflow automation and efficiency. By leveraging these automation types, organizations can significantly reduce manual efforts, improve response times, and enhance overall productivity. Whether it's automating routine tasks through Time-Based Automations or responding to real-time events using Event-Based Automations, Issuetrak empowers users to manage their issue tracking processes with precision and ease. Integrating these automation types into your workflow will undoubtedly lead to a more streamlined and effective issue tracking experience in Issuetrak.
Closing Thoughts
If you would like the assistance of our product experts in implementing automation that fits your company's unique needs, please do not hesitate to contact us with any questions.
